Saving and loading patches
MIDI Goblin comes with a micro sd card that has a few synthesizers already added. Like the yamaha reface cs and volca keys. If you have a synth that isnt listed in the device select menu and want to use MIDI Goblin to save and load patches for it - please follow the wizard tutorial! - reminder: MIDI Goblin is designed to save and load patches consisting of CC and NRPN messages (no sysex support as of the writing of this tutorial)
MIDI Goblin is designed to save files containing values received from synths/midi controllers or even values generated using the built in MIDI controller. The principles are the same for any device.
define a list of your device’s parameter numbers using the wizard
connect your device to the MIDI Goblin
Feed the Goblin parameter values using the synth/controller or the goblin’s built in MIDI controller,
save patches
load patches

For this tutorial we’ll use the Yamaha Reface CS. It’s a great example because it can set its midi in and out channels individually, has connections for both(sort of) and like all good synths, has some quirks you need to sort out in order to get things working…it’s also got a very convenient bonus feature (it dumps all of its parameter values on startup…more on that later)
set your midi in/out channels (video tutorial by The Digital Lost) note: MIDI Goblin listens on all channels so the transmit channel doesn’t matter. I chose 2 for my receive channel.
turn ON midi control by holding down the E2 key and turning the synth on. (instruction manual)
setting things up
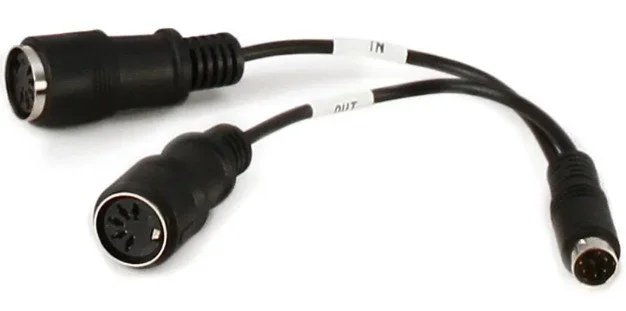
The reface CS also doesn’t have dedicated MIDI IN and OUT connectors - but thankfully it comes with a handy dandy little adapter.
Turn off the Reface CS
Plug the adapter into the reface CS.
Plug the adapter’s OUT connection to the MIDI Goblin’s IN connection using a 5 pin midi cable.
Plug the adapter’s IN connection to the MIDI Goblins out connection using another 5 pin MIDI cable
Your device can receive midi cc messages
You know what your receive channel is.
If your synth has a midi output connection, transmitting control change messages is enabled.
You’ve got the MIDI IN and OUT connections connected properly
If you’re using a different synth - no worries. But check your manual and ensure that
…Now that everything is plugged in - turn on your MIDI Goblin!

After the splash screen displays for 2 seconds, you’ll be brought to the Device Select screen. Here you’ll be shown a list of synths you have installed on your goblin.
Scroll down to REFACE_CS and press the “yes” button on your MIDI Goblin.
Next, let’s finish setting things up - scroll down to “SETTINGS” and press “yes”

There are many different settings that can be accessed through this menu, but for this tutorial we just want to make sure we’re using the correct MIDI Channel for patches. Select “MIDI OUT CHANNELS” and press “yes”


change the channel of “PATCHES” to your synth’s receive channel. (if your synth sends and receives on the channel, that’s okay, just choose that channel)
Press the BACK button on your MIDI Goblin to head back to the settings menu, select “SAVE SETTINGS” and press “YES”
This will create a settings file for your synth in your synthesizers “CONFIG” folder. Lots of info gets saved here and if you ever want to reset all your settings…just delete the file. A reset option is planned for a future update of the MIDI Goblin firmware.

This this point you’re done settings things up. Next lets learn a bit about how MIDI Gobin saves patches….it’s pretty simple but this is fairly important info. This is optional information but I highly suggest reading…
Press the back button and head to the monitor app by selecting MONITOR and pressing “yes”

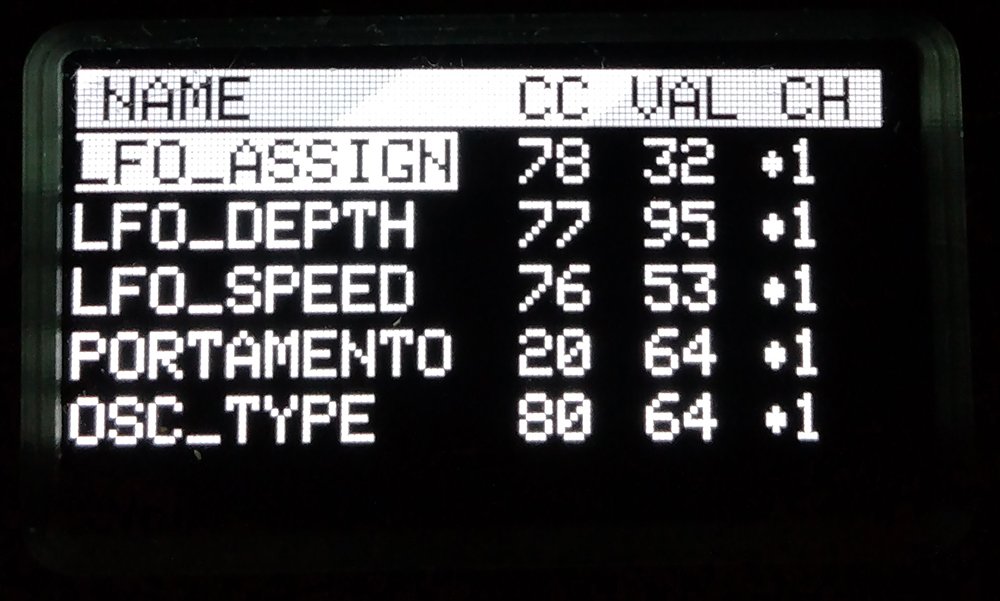
The monitor app displays the following info:
a list of your device’s parameter names
the corresponding cc number (or nrpn MSB/LSB)
the current values of the parameters
The channel the last msg was received on. In v 1.02 these 5 entries are always the same number
When the Goblin is first turned on every parameter has a value of zero by default..because the goblin has not received anything. if we move the lfo assign slider on the reface CS - the value will change and there’s a little dot next to the number to indicate that the value has been received.

important: only received values (the ones with dots next to them) get saved to patch files. This gives MIDI Goblin the ability to save partial patches and prevents saving/loading parameter values that have not been received….basically, if you see a dot - you’re good. If you don’t see a dot, you may want to wiggle the slider, knob, button or switch to get a reading from your synth….if your synth doesn’t have a midi output connection - dont worry, you can initiate things using the built in MIDI Controller or external midi controller with MIDI CC thru enabled in the settings menu.

Don’t want to wiggle every slider every time you turn on your goblin/synth?
The Reface CS has a great feature - it dumps all of its parameter values on start-up…so basically, just make sure to turn it on after you select “reface cs” from the device menu. This way the goblin and the reface will instantly be synced. If your synth doesn’t dump things on start-up, a work around is to simply load a patch file that has all the parameters saved in it….some synths also have bult-in dump commands and the vongon replay has a special dump command I’ve added in its patches folder - just load that file and you’re in bidnis.
With that out of the way - lets save a patch! Hit the back button to go to the main menu.

select patches and press “yes”
the patches menu is where you save save, load, delete and overwrite patches.
The “PANEL” file is a file that is automatically generated. It saves whatever values have been received or generated by the goblins midi controller app at the the time any patch is saved or loaded.
The panel file is not a perfect system since it but it can be quite useful if you have synced your synth to the goblin and accidentally load a patch then want to go back to what is on the synth’s panel.
To save a new patch, press the “save new” button
Move the cursor by pressing the arrow keys, and change the characters by rotating the encoder
Then press “yes”
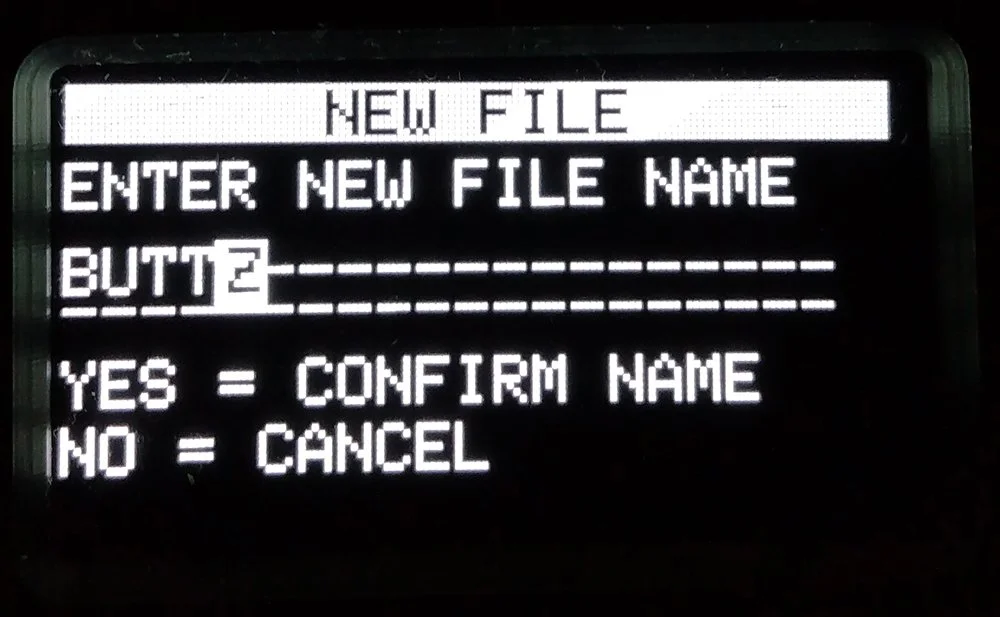

Congrats! You’ve saved your first patch!
Fiddle around with your sliders, and save another patch or two.


To load a patch, select it and press the “yes” button or “send” button or the encoder’s built-in button.
If you head back to the monitor after you’ve loaded a patch, the values update and you get a little dot next to each value that was loaded (indicating that the Goblin and synth are both synced for that parameter)
If you are using a synth with no midi output connection this is quite helpful. Loading any full patch, will instantly sync the goblin and the synth. To continue editing the patch, use the controller app or an external midi controller hooked up to the MIDI Goblins input with midi CC thru enabled in the settings menu…another tutorial on synths with no midi output connections is coming in the near future.